So you have decided to start an online store with Ecwid but not sure exactly how to get started?
Well in this guide I am going to take you through the 10 steps you need to do in order to get your store set up and running.
Ecwid TutorialStep 1: Sign Up To Ecwid
The first step in getting started with Ecwid is to sign up to the platform (if you haven't already!). Ecwid has made it really easy to get started and it is simply a case of entering your name, email address and creating a password.
Once you have done this, you will be sent a confirmation email and once this is done, you are good to go on their free plan, which is free for life.
Once you have completed the sign up process, you will be taken through to the Ecwid dashboard and it is from here that you can start building your website.

For this tutorial, I will be focusing on building a website using the Ecwid platform.
The next step in getting your Ecwid store up and running, is to start adding products to your inventory and this can be done by going to Catalog → Products and then clicking the Add New Product button.
This brings you to the add new product page and as you can see from the image below, Ecwid have opted for a tabbed layout and it allows you to create a couple of different types of products including:

Simple products are single product listings and these are very easy to create as you just need to fill out the:
You can also set your own meta title and description within the SEO tab but once all this is done, click the add product button and it has now been added to your inventory and the front end of your website. It is very simple to do this and if you are selling lots of similar products, you can use the Duplicate Product option.
Product VariationsIf you are selling products that come with different variations, such as sizes or colours, then you will need to configure these using the options tab.
As you can see in the image below, there is a heading for options and then for variations, this is because it is a two part process to set this up.

Product Options
The first part is setting up the options, so this would be things like colour or size. Once you have created an option, you need need to then add a value for it and there are multiple different options you can choose from.
If you have options to choose from, such as sizes (small, medium, large etc), then you would choose one of the following options from the Input Type drop down menu:
If you are selling a personalised product, then you would choose on of the remaining input types that best suits your products. This then displays a customisable area on the store page for your customers to input their required personalisation.
If you require more than one option, such as size and colour, then simply click the Add New Option button and then add the relevant values under the option.
Within the options value section, you can set up price modifiers that automatically adjust your prices from the main price you set in the General tab, this can either be by a fixed price or percentage.
Product Variations
Now you have set the options and value, click the Variations heading and you will be taken to the variations page. To set up a new variation, click the New Variation button and the following pop up will appear:

This pop up allows you to add a separate image, SKU code, weight, attribute, price and stock management for your new variation. If you have created multiple selectable attributes, such as size and colour, you will be able to select these from the drop down menus at the top.
Once you have set up your variation, click the Ok button and it will add this variation to your product and the variation page will look something like this:

If you want your main product image to appear when someone clicks on your product page, then make sure you click the Do not preselect default value checkbox under the options heading. If you do not do this, then your first variation image will appear and this might be confusing for customers.
Digital & Virtual ProductsThe next type of product set up you can do in Ecwid is to create digital and virtual products, these may sound the same but the digital product will have a downloadable element such as an ebook.
Whether you are selling a virtual or digital product, you want to turn off the shipping options within Ecwid and this is very easy to do. Simply navigate to the Shipping tab and disable the shipping option, by default this is enabled.

If you are just selling virtual products or services, there are no additional steps you need to take but if you are selling a digital product with a downloadable elements, then you need to go to the files tab.
Here you will be able to upload a file to your product and this can be done by clicking the Upload Files button and a pop up will appear that lets you browse your computer for your chosen file. Just to note that the file upload limit size is 25gb. Once the file has been uploaded, you can create a description for that file, then click the save button and that file has been added to your product.

Once you have created your digital product, you can set a time limit for the link to be useable and/or a maximum number of download attempts. This is done in the settings section of the dashboard under the Cart and Checkout tab of the general settings and scrolling down to the E-goods section.
Editing Your ProductsThe final step in setting up your inventory is knowing how to do back in and edit your products.
Unfortunately, Ecwid lacks any form of bulk editor for products and this means that when you need to update stock quantity or product descriptions, you will need to go in and do this on a product by product basis.
Step 3: Create CategoriesOnce you have created your products, you want to organise them into categories, so that it is easier for your customers to navigate around your website and find exactly what they are looking for.
Root (Parent) CollectionsEcwid uses what is basically a parent/child category system, in the you create a parent (root) category and then you can create child categories. For example you could create the following type of structure:
This can be done by going to the Category section under the Catalog heading within the main navigation side bar. Clicking the Add Root Category will show you a page layout the same as in the image below:

The most basic information you need to enter is a name for the category, the category URL will be generated from the title so make sure that it contains the keywords that you want.
Additionally, you can add a category image, which you will want to add if you are featuring this category on your sites front page. You can also add a description, this not only displays on the front end of your site but will also be used to generate the meta description for the category.
Once you have have filled in all of the sections on this page, click the save button and you will have created a new category.
Sub-CategoriesOnce you have created your parent categories, you may want to then create some cub-categories, like I showed in the Men's Jewellery example above.
To do this, click on the parent category you created and you will see that the Add Subcategory and Delete buttons will become clickable. Simply click the Add Subcategory button and you will see a new screen appear, like the one in the image below.

As with the parent category, once you have filled in all of the sections that you want, click the save button and your new sub-category will have been created.
You can also create sub-sub-categories if you want to by following the same process but you highlight the sub-category rather than the parent category before clicking the Add Subcategory button.
Adding products to categories or sub-categories can be done in one of two ways. The first is to go back in and edit your products and select a category on the general settings tab.
The second is to click the Category Products heading in the create/edit category page.

Under this heading, clicking the Assign Products to Category button will bring up a pop up that shows you all of your current products. Simply select the products that you want by clicking the check box next to them and then click the Add Products button and they will then be added to this category.
Now you have got all of your products set up, you need to add a way of getting paid! Setting this up in Ecwid is very easy to do as there is a payment section under the configuration heading within the main sidebar.
In the main Payment section, the main options displayed to you are Stripe, Square and PayPal and these can be set up by clicking the blue button on each of these sections.

If you want to set up other payment methods, then scroll down to the bottom of the page, where there is a section to add offline payments such as bank transfer or cash on delivery.
There is also another section below this that shows all of the available payment gateways for your country that can be selected from the drop down menu. If you want to use an international payment gateway, then there is a selection of all the available payment gateways at the bottom of the page, which you can select from the dropdown menu and then set up.
Step 5: Set Up a Shipping MethodThe next step to set up a shipping methods so that you can let your customers know, not only how their item will be shipped but also how much it is going to cost. All of these setting can be found under the Shipping & Pickup section of the main navigation menu.
Setting up your shipping method is basically is three step process. Once you have click the Add Shipping button on the main Shipping page, you will be taken to the first step, which is to select your carrier.
If you have a national carrier such as Royal Mail here in the UK, then this will likely be the first option and any other pre-installed options will appear. If you want to enter your own carrier, then just type the carriers name into the box at the bottom.

The second step is to set up the rates for your shipping. Automatic rates are only available to carriers that are already set up and integrated with the Ecwid platform, if your chosen carrier is not already integrated, then you will have to set up the prices manually.
Within every carrier, there are four main options that you can choose from:

As all these options are different, the appearance of the third step will also be different, with the custom rates page having the most options.
One the third step, you will also need to select your shipping zone and this is the region of the world for which this shipping method applies. As you can see from the image below, this is at the bottom of step 3.

There are some pre-configured zones already set up on Ecwid but it is still worth going in and checking the configuration of these, and they can be managed by clicking the Manage Zones button.
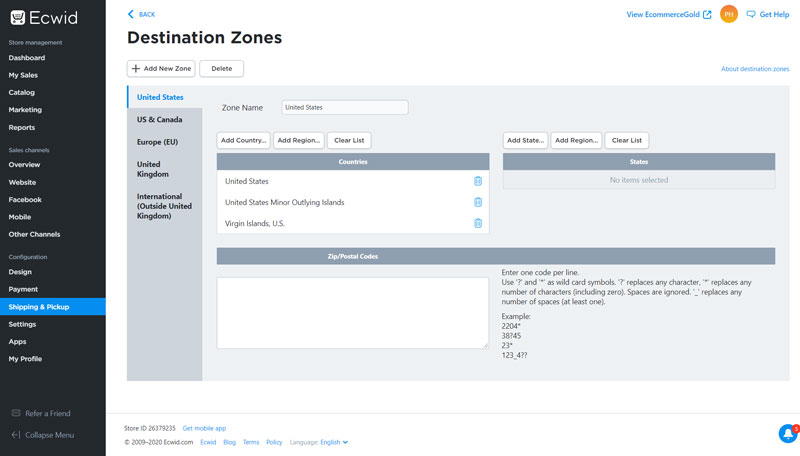
On this page, you will see all of the zones that are installed on your Ecwid site and you can choose to edit existing ones or create entirely new ones.
Within the zones, you can set them up so that they apply to a whole country or set of countries, individual states or specific zip or postal codes.
Setting up zones is very useful as this is how you set your store up so that you only sell and ship to certain countries. It is also useful if there are certain parts of your country where it costs more to post items to. Once you have got all of your shipping zones set up, you can then assign them to your chosen shipping methods.
Step 6: Settings & Legal PagesThe next step is to go in and configure your websites business settings and legal pages. Ecwid have made this very easy to do by navigating to the settings section of the dashboard.

Within the settings section, there are lots of the settings you can configure but the important settings you want to get set up properly are your:
The reason why you want to get all this set up properly, is so that you know that your store is legal when you are ready to go live.
With the legal pages, there templates to work from, so you will need to find them for yourself. It is also getting these checked out by a ecommerce legal professional, to make sure that they are legal and comply with all the relevant rules and guidelines.
The next step is to learn about how the order management system works on Ecwid as what to know what to do and how to do it before your store goes live.
Fortunately, the Ecwid order management system is very simple and straightforward to use. From the main order overview page, which can be found by clicking My Sales → Orders, you can choose to manage your orders in bulk or individually.

To manage your orders in bulk, simply select all of the orders you want to manage by checking the box on the order and then click the Mass Update button, which will present a dropdown menu with multiple options including:
Select which operation you want to do and a pop up will appear asking you exactly what you want to do or it, if you select Print Orders, then a new tab will open, showing your invoices and your browsers print procedure will appear.
Refunding an order through Ecwid has to be done from the payment processors dashboard but with PayPal and Stripe, the payment status within the Ecwid dashboard will automatically be updated. For other gateways, you will have to update this manually.
By this point, pretty much all of the ecommerce aspects of your store should be ready to go and now you want to start customising the look and feel of the front end of your website as this is what your customers are going to see. And while this isn't one of Ecwid's really strong points, there are still a few things you can do.
But before you begin customizing your site, you want to ensure that the New-Gen Instant Site is activated on your site, so that you get access to the new theme customizer, you can check this by going to Settings → What's New and scrolling to the bottom of the page.

Some new sign up may not have this option and be automatically using the new customizer, you can see in one of the images below what the New-Gen Instant Site customizer looks like.
This first part of this is to get to the page where you can begin customising your site and even though you might think so, it is not under the design heading within the navigation bar. Instead you want to click on the Website heading in the Sales Channels section, this brings up the following page:

At this point, you want to click the Edit Site button, which will take you through to the live customizer, which looks like this:

This is the New-Gen Instant Site builder and offers much more in terms of customization than the previous set up but there is a much smaller selection of pre-built site templates and these can be accessed by clicking on the Settings Icon (Gear Icon) in the top left and clicking on the Site Templates option.
To select on of these templates, simply hover your mouse cursor over your chosen template and click the Use Template button that appears.


The new customizer is built on blocks and you can choose to edit, add, remove or rearrange (rearranging can be done by clicking the settings icon and clicking Reorder Blocks) and each block comes with a selection of options, which are split over two tabs:

Enter your text here ...

In the design tab, it depends on the block you are editing as to the options available, some of the product related blocks settings are configured in the separate part of the dashboard, which is covered more below.
Once you have set up your site how you want, you need to click the blue Publish button in the top right hand corner and this will publish these changes to your live site. You can also Preview or Discard any changes by clicking on the drop down menu next to the Publish button.
Product Design SettingsYou can also change the layout of your category and product pages by clicking on them, this can also be done by going to the design section within the main dashboard.

Within the Design section of the dashboard, there are lots of layout settings that you can choose from for your product and category pages, including:
Once you have got everything set up and customised so that you are happy with it, it is time to connect your own domain name to your Ecwid site. Even though you do get a free .company.site domain name with Ecwid, it is always better to connect your own domain name as this just helps your business in the long term.
Connecting your domain name to Ecwid is very easy to do. Just click on the Website heading in the Sales Channel section of your navigation bar and scroll down until you see the Domain name and site address section.

Then click on the Change Address button and a pop up will appear, within this pop up, you can enter your chosen domain name and instrctions will appear that tell you how you can point your domain name towards the Ecwid servers.

Source: Ecommerce Gold


When you subscribe to the blog, we will send you an e-mail when there are new updates on the site so you wouldn't miss them.